Drywall anchors, which are often referred to as wall anchors or wall plugs, are tools that are utilized to ensure that objects are attached to drywall with additional support. Drywall is a material that is frequently used for the construction of interior walls; nevertheless, it is not always durable enough to support large objects or items that require a solid attachment.
Materials such as plastic, metal, or a combination of the two are frequently used in the production of dry wall anchors. There are many other types of expansion anchors, toggle bolts, and threaded anchors, but the most frequent ones are expansion anchors, toggle bolts, and extension anchors.
Creating a hole in the drywall is the first step in the process of using a drywall anchor. After that, the anchor is inserted into the hole, and when a screw is tightened into the anchor, it expands or grips the drywall from behind, so creating a secure hold. This makes it possible to attach things like shelves, artwork, mirrors, curtain rods, and light fixtures to the wall in a secure manner without the chance of the object falling or being damaged.
In cases when there are no studs or other structural supports under the drywall to firmly anchor objects, drywall anchors are a vital component to have. They are commonly accessible at hardware stores and are available in a variety of weight capacities to suit a wide range of loads due to their versatility. The weight of the object that is being mounted and the type of wall material are two factors that should be taken into consideration when selecting the appropriate type and size of drywall anchor.
Importance of Using Drywall Anchors for Secure Mounting :
Drywall anchors are an essential component in the process of guaranteeing the safe and secure mounting of objects to interior walls. They provide a number of important advantages that contribute to the overall structural integrity and safety of the installation. Acquiring an understanding of the significance of utilizing drywall anchors will assist in preventing harm to the mounted object as well as the wall that is surrounding it, while also assuring that the installation will last for a long time. The following are some of the factors that underline the significance of utilizing drywall anchors for mounting that is secure:
Weight Distribution: Drywall anchors are designed to distribute the weight of the object that is being mounted across a greater area of the drywall. This helps to reduce the amount of force that is concentrated on a single location. This makes it possible to prevent the drywall from becoming damaged or weakened over time, which is especially beneficial in places that are subjected to frequent stress or large loads.
Enhanced Stability: Drywall anchors help prevent the mounted object from shifting or becoming dislodged by providing a strong anchor point for screws or bolts. This helps to ensure that the object remains in place. The stability of the installation is improved as a result of this, which in turn reduces the likelihood of accidents or damage being caused by the object falling.
Versatility : The flexibility of dry wall anchors allows them to be utilized for mounting a broad variety of items, such as shelving, artwork, mirrors, curtain rods, and light fixtures, among other things. Because they are compatible with a wide range of wall materials, such as plasterboard, drywall, and paneling, they are a versatile option that can be utilized for a variety of home renovation related jobs.
Ease of Installation: In terms of ease of setup, dry wall anchors are reasonably simple to install and call for a limited amount of tools and materials. They provide a dependable mounting option that does not require sophisticated installation methods or specialist expertise, which makes them accessible to do-it-yourself enthusiasts and homeowners.
Preventing Wall Damage: The correct application of drywall anchors helps to prevent damage to the wall that is around the drywall, such as cracks, holes, or bulges that are caused by insufficient support. Drywall anchors reduce the likelihood of damage to the wall by securing the object that is attached to it. This helps to maintain the wall surface’s integrity and look.
Durability: Drywall anchors, when put properly, offer a mounting option that is both long-lasting and durable, and it is able to resist the test of time. In addition to reducing the frequency with which modifications or repairs are required, they provide the peace of mind that comes from knowing that the object that is mounted is firmly attached to the wall.
It is impossible to stress the significance of utilizing drywall anchors for the purpose of producing a secure mounting. Drywall anchors are a vital component of any successful home improvement project that involves mounting objects to inside walls. This is true whether the project is being undertaken for the purpose of safety, stability, adaptability, or durability.
Different Types of dry wall anchors
There are many different types and designs of drywall anchors, and each one is designed to accommodate a certain set of applications, load capacities, and installation techniques. In order to select the appropriate anchor for your particular mounting requirements, it is vital to have a thorough understanding of the characteristics and features that are associated with each type of drywall anchor. Some popular types of anchoring for drywall are as follows:
Expansion Anchors:
When it comes to drywall anchors, expansion anchors, which are sometimes referred to as plastic anchors or conical anchors, are among the most widely used alternatives.
These anchors have a tapered shape featuring ribs or fins on the outside that expand when a screw is placed, so establishing a secure grip against the drywall. – The design of these anchors is tapered.
Picture frames, towel racks, and small shelves are examples of the kinds of lightweight items that are frequently mounted with expansion anchors. These anchors are ideal for mild to moderate loads and are frequently used for mounting.
Toggle bolts.
In addition to being known as butterfly anchors or molly bolts, toggle bolts are a type of sturdy anchor that is built to support larger loads.
These anchors are made up of a bolt that has wings or toggles that are spring-loaded and fold flat against the bolt so that it can be inserted into the drywall.
After the toggles have been inserted into the wall, they expand to create a secure hold, which in turn distributes the weight over a larger area of the cement board.
Toggle bolts are an excellent choice for mounting heavier items, such as huge mirrors, televisions, and shelving units that are designed for heavy-duty use.
Threaded Anchors:
Anchors that are threaded, also known as self-drilling anchors or threaded drywall anchors, are adaptable anchors that can be used for a variety of purposes depending on the situation.
These anchors have a screw-like construction with coarse threads, which enables them to be put directly into the drywall without the need for pre-drilling. This eliminates the danger of damaging the drywall.
Threaded anchors are available in a variety of lengths and load capabilities, which enables them to be utilized for attaching objects that range in weight from quite light to quite heavy.
Mounting objects like curtain rods, towel bars, and light fixtures are frequent applications for these types of brackets.
Plastic Ribbed Anchors:
Wall plugs, also known as plastic wall anchors, are another name for plastic ribbed anchors. These anchors are easy to use and affordable, making them suited for applications that require light-duty support.
These anchors include features that are either ribbed or fluted, which allow them to offer a secure grip when they are inserted into the drywall.
Anchors made of plastic with ribs are frequently utilized for the purpose of fastening lightweight items like wire clips, electrical boxes, and other small decorative items.
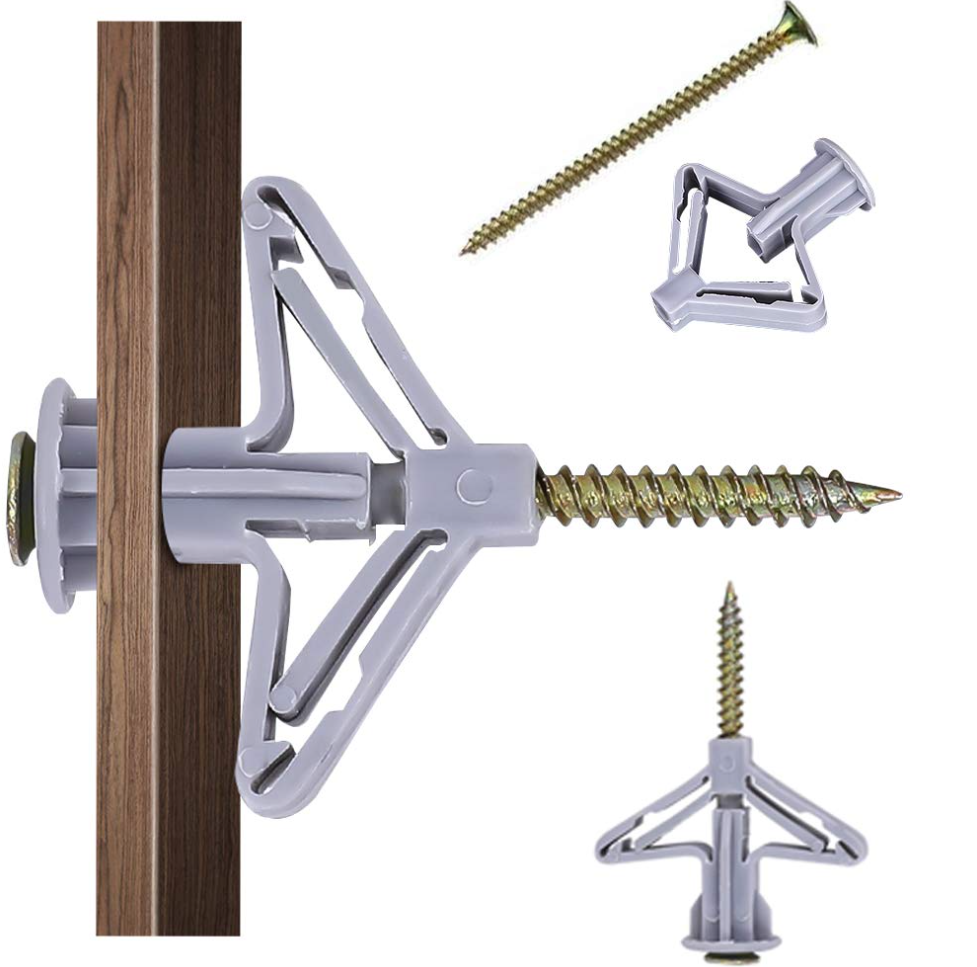
Winged Plastic Anchors:
Winged plastic anchors, also known as hollow wall anchors or screw-in anchors, are designed for use with materials that have thin walls or hollow walls, such as drywall.
These anchors are made of plastic sleeves that have two or more wings that fold flat against the sleeve so that they can be inserted into the wall.
Once the wings have been inserted into the wall, they will expand to offer a strong hold against the rear of the drywall.
When it comes to fastening goods of a medium weight, such as mirrors, towel racks, and bathroom accessories, winged plastic anchors are an excellent choice.
It is crucial to select the appropriate anchor by taking into consideration the weight of the object that is being mounted as well as the type of wall material. This is because each type of drywall anchor has its own set of characteristics, load capacities, and installation procedures. You will be able to select the anchor that is most suited to meet your particular mounting requirements if you have a thorough understanding of the differences between these several types of drywall anchors.
Required Tools and Instruments for Drywall Anchors
Before beginning the process of installing drywall anchors, it is crucial to acquire all of the necessary tools and materials in order to ensure that the installation procedure will be effective and efficient. For the purpose of achieving a secure and dependable mounting of objects on drywall, having the appropriate equipment on hand is of great assistance. For the purpose of installing drywall anchors, the following is a list of the necessary tools and materials:
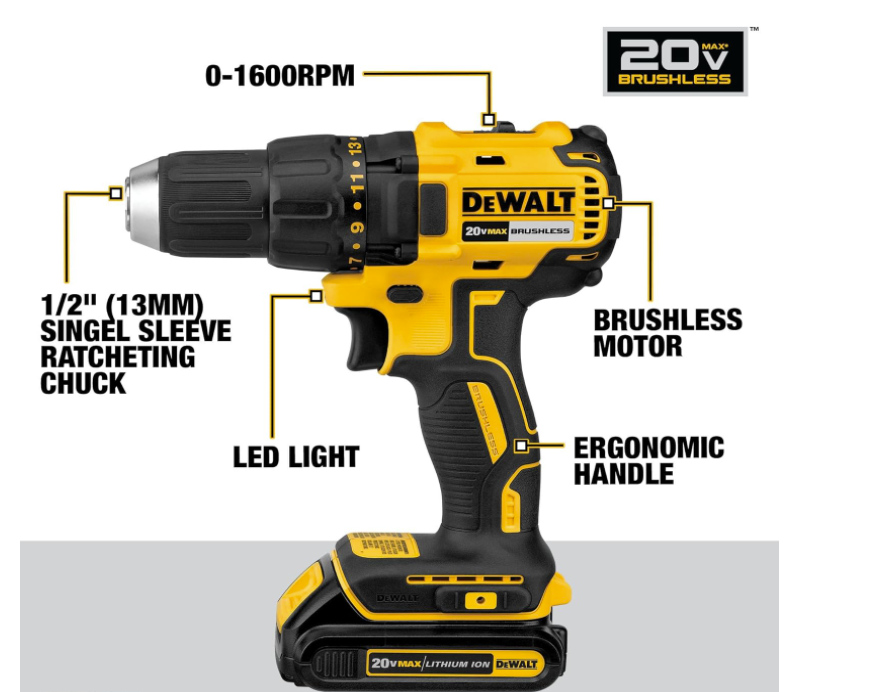
Take a drill:
It is absolutely necessary to have a power drill equipped with an appropriate drill bit in order to create pilot holes in the drywall. Be sure you select a drill bit size that corresponds to the diameter of the anchor that will be utilized.
Screwdriver:
For the purpose of inserting screws or bolts into the anchors, you might require a screwdriver or a screw gun, depending on the type of drywall anchor you are currently using. Check to see that the screwdriver you are using is compatible with the type of head that the screws or bolts have.
Drywall Anchors:
The weight of the object that is being mounted and the type of wall material should both be taken into consideration when selecting the right type and size of Anchors for Drywall. Expansion anchors, toggle bolts, threaded anchors, plastic ribbed anchors, and winged plastic anchors are some of the most common types of anchors used for drywall.
Screws or Bolts:
When selecting screws or bolts, make sure they are compatible with the drywall anchors that are being utilized. It is important that the length and diameter of the screws or bolts be in accordance with the specifications that were provided by the manufacturer of the anchor.
Equipment for Safety Purposes:
It is recommended that you use safety goggles or glasses in order to protect your eyes from the dust and debris that is produced during the drilling process. Furthermore, the use of gloves can assist in protecting your hands from sharp edges and the possibility of accidents.
Marker or the Pencil:
Before beginning to drill pilot holes, it is recommended that you first mark the drilling spots on the drywall with a pencil or a marker. It will be easier to avoid making mistakes and guarantee that the anchors are placed accurately if you do this.
Level
The use of a level can be of assistance in ensuring that the object that is mounted is straight and level once it has been fitted. When you are ready to secure bookcases, artwork, or other things in their new positions, use a level to ensure that they are aligned properly.
Stud Finder
A stud finder can assist you in locating studs that are hidden beneath the drywall if you like mounting objects to studs for the purpose of increasing their stability. Particularly helpful for heavy goods or products that require additional support is the fact that this is available.
If you make sure to gather all of the essential tools and materials before beginning the installation process, you will be able to ensure that the mounting of objects to drywall using drywall anchors goes smoothly and successfully. You will be able to accomplish outcomes that are secure and reliable for your home renovation tasks if you take the time to prepare and employ the appropriate tools.
Preparing the Installation Site
The installation site must be adequately prepared before drywall anchors can be installed. This is necessary in order to guarantee a safe and successful mounting process. It is possible to achieve more exact positioning of the anchors, reduce the amount of damage done to the drywall, and improve the overall stability of the installation by properly preparing the area. Some of the most important actions to take in order to get the installation site ready for mounting objects with drywall anchors are as follows:
Choosing the mounting location:
It is important to select the ideal spot on the drywall where you intend to attach the object with great deliberateness. You should take into consideration a number of things, including the weight of the object, the surroundings around it, and any obstructions that could potentially impair the installation.
Marking the drilling points:
Mark the precise drilling places on the walls where the anchors will be set with a pencil or a marker. This will guide the installation of the anchors. Accurately measuring and marking the positions will guarantee that the anchors are aligned correctly and that there is distance between them.
Determining the weight capacity:
First, it is necessary to ascertain the weight capacity and load needs of the object that is going to be installed before moving on with the installation. You will be able to select the suitable type and size of drywall anchors that are able to sustain the weight of the object with the assistance of this information.
Examining obstructions:
Before installing the anchors, you should check the wall area where you intend to put them to see whether there are any concealed impediments, such as studs, plumbing pipes, or electrical cables. Utilize a stud finder or touch the wall gently in order to identify any obstructions that may be hidden underneath the drywall.
Measuring and Marking the Anchor Position :
It is important to correctly measure and mark the distance between the anchors when mounting several objects or when employing multiple anchors for a single object throughout the mounting process. Because of this, the weight distribution will be more even, and the object that is mounted will receive the appropriate support.
Leveling the Mounting Surface :
Before placing the anchors, make sure that the mounting surface is straight and level by using a level to check before you attach them. Make any necessary adjustments to the location of the markings in order to get the desired alignment for the object that is mounted.
Cleaning the installation area:
If there is any furniture, decorations, or other items in the immediate area that could potentially impede the installation procedure, you should remove them. Not only will this provide adequate space for working, but it will also avoid inadvertent damage to objects that are nearby.
Assuring the Safety of the Working Area:
A drop cloth or other protective covering should be placed on the floor beneath the installation location in order to collect any dust or debris that may be produced as a result of the drilling process. As a result, the floor will be better protected, and the cleanup process will be simplified once the installation is over.
If you follow these procedures to prepare the installation site, you will be able to ensure that the process of mounting using drywall anchors will go smoothly and efficiently. For the purpose of mounting objects to drywall, proper preparation helps to create a foundation that is stable and secure, which in turn enhances the overall durability and duration of the installation.
Installation of Drywall Anchors :
The installation of drywall anchors is an essential step in the process of firmly mounting objects to drywall. This step ensures that the installation will be stable and long-lasting. The correct installation of drywall anchors requires careful drilling, the insertion of the anchors, and the fastening of the anchors in place to create a stable base for mounting objects. Installing drywall anchors involves the following steps, which are explained below:
Drilling pilot holes:
To drill pilot holes in the drywall at the spots that have been marked, you need make use of a power drill that is fitted with an appropriate drill bit. According to the size of the anchor that is being used, the diameter of the drill bit should be the same. If you want to prevent damaging the wall that is underneath the drywall, you should be careful not to drill too deeply.
Installing the dry wall anchors:
After drilling the pilot holes, the drywall anchors should be inserted into the holes that have been created. It is possible that you will need to use a hammer to gently pound the anchor into place, or you may simply need to press it in until it is flush against the surface of the drywall. This could be necessary depending on the type of anchor.
Securing the anchors:
Put a screw into the expansion anchor, and then use a screwdriver or a screw gun to tighten the screw. This is done if you are employing expansion anchors. When the screw is tightened, the anchor expands against the back of the drywall, which results in a secure hold being created and maintained.
To install toggle bolts, first enter the bolt through the mounting hole of the object that is being placed, and then press the wings of the toggle through the hole in the drywall. When the bolt is tightened, the wings will expand once they are into the wall, giving a strong anchor point for the bolt.
Using a screwdriver or a screw gun, threaded anchors can be screwed straight into the drywall until they are securely set against the surface of the drywall. This process can be repeated as many times as necessary.
Testing Stability:
After you have finished putting the anchors, give them a light tug to make sure that they are firmly embedded in the drywall and that they are able to sustain the weight of the object that is being mounted. Removing any anchors that appear to be loose or unstable and reinstalling them in a different location is the best course of action.
Repeat for Additional Anchors
It is necessary to repeat the drilling and installation process for each anchor in the event that you are mounting numerous objects or using multiple anchors for a single object. This will ensure that the anchors are properly spaced and aligned with one another.
Adjustments and leveling:
In order to guarantee that the object that is being mounted is straight and level before you completely secure it in place, you should use a level. Therefore, in order to obtain the correct alignment, it is important to make any necessary adjustments to the location of the object or the tightness of the screws.
Final Checks:
After all of the anchors have been installed and the object that is being mounted has been positioned, it is important to double examine the installation’s stability and alignment. For a mounting that is both solid and stable, make sure to tighten any screws or bolts that are required. Ensure that the mounted objects remain securely in place by installing drywall anchors in the correct manner. This reduces the likelihood of any accidents or damage occurring.
Utilizing Drywall Anchors for the Mounting of Objects
When mounting objects with drywall anchors, it is necessary to attach the objects in a safe and secure manner to the drywall anchors that have been set in the wall. Whether you are hanging bookcases, artwork, mirrors, or other fixtures, utilizing drywall anchors to attach objects in the correct manner ensures that your installation will be stable and will last for a long time. The following is a comprehensive list of the stages involved in mounting objects with drywall anchors:
Preparing the object:
Before mounting the object, check to see that it has been appropriately prepped for installation. In the event that it is required, this may involve connecting any mounting hardware, such as hooks or brackets, to the rear of the object.
Aligning with anchors:
The object should be positioned against the wall so that it is aligned with the drywall anchors that have been put. Before continuing with the mounting process, it is important to make sure that the object is straight and level by inspecting it with a level.
Attaching screws or bolts:
Installing screws through the mounting holes in the object and aligning them with the anchors that have been set on the wall is required if expansion anchors are being used. To ensure that the object is properly fastened to the wall, securely tighten the screws into the anchors with a screwdriver or a screw gun. This will ensure that the object is firmly secured.
The screws for toggle bolts should be inserted through the mounting holes in the object, and then they should be aligned with the toggles of the anchors that have been mounted on the wall. In order to ensure that the toggles are firmly fixed behind the drywall and that the object is held in place, the screws should be tightened until they are.
Threaded anchors are designed to accommodate screws that are screwed directly into them. In order to connect the object to the wall, you must first align the screws with the anchors and then use a screwdriver or a screw gun to tighten the screws in a secure manner.
Checking Stability:
When you have finished securing the object to the drywall anchors, you should carefully evaluate its stability by applying pressure or pushing on it in a deliberate manner. It is imperative that the object be mounted in a secure manner and that it does not move or wobble.
In the event that the object appears to be loose or unstable, it is important to verify that the screws or bolts are securely fastened and to make any required changes in order to guarantee a secure attachment.
Final Adjustments :
After the object has been placed in a secure manner, any necessary modifications to its location or alignment should be made during this stage. Make use of a level to guarantee that the object is straight and level in order to achieve an installation that appears to be professional.
Completing the Installation :
You will have successfully completed the installation of the mounted object using drywall anchors if you have determined that the object is stable and aligned to your satisfaction. Appreciate the object that has been installed securely and take pleasure in the way it looks on your wall.
If you follow these instructions, you will be able to mount objects using drywall anchors in an efficient manner, which will provide a stable and long-lasting installation that improves the aesthetics and functioning of your space. When objects are mounted correctly with drywall anchors, they remain firmly in place, which gives you peace of mind and ensures that your home improvement projects will continue to function effectively for a long time.
Recommendations and Best Practices : Drywall Anchors
When mounting objects using drywall anchors, it is necessary to pay close attention to the details and follow to the best practices in order to guarantee a safe and successful installation. It is possible to obtain a product that appears professional while simultaneously reducing the likelihood of damage or accidents if you adhere to the following recommendations and best practices:
Select the appropriate type of dry wall anchors:
Determine which drywall anchors are appropriate for the object that is being installed, taking into account both its weight and its size. There are numerous varieties of anchors, each of which has a unique weight capacity and installation method. Therefore, it is important to select the suitable anchor for your particular mounting requirements.
Ensure that the Installation Site is Properly Prepared:
After carefully measuring and marking the drilling places on the drywall, you should proceed with the installation of the drywall anchors. In order to ensure that the anchors are placed accurately, you should make use of a level to check that the mounting surface is straight and level.
Utilize the Appropriate Instruments and Equipment:
For the purpose of drilling pilot holes in the drywall, a power drill equipped with the suitable drill bit size should be utilized. Before beginning the installation process, check to see if the screwdriver or screw gun uses a head type that corresponds to the screws or bolts that will be used.
Check for Hidden Obstructions:
Before beginning to drill pilot holes, it is important to make sure that there are no hidden obstructions beneath the drywall. These could include studs, electrical cables, or plumbing lines. Utilize a stud finder or tap the wall gently in order to identify any potential obstructions that could have an impact on the installation.
Test Anchors for Stability:
After you have finished putting the drywall anchors, give them a light tug to make sure that they are firmly embedded in the drywall and that they are able to sustain the weight of the object that is being mounted. Remove any anchors that appear to be loose or unstable and then reinstall them in a new spot if you find that they are.
Properly Align and Level the Mounted Object:
In order to guarantee that the object that is being mounted is straight and level before you completely secure it in place, you should use a level. Therefore, in order to obtain the correct alignment, it is important to make any necessary adjustments to the location of the object or the tightness of the screws.
Think about the distribution of the weight:
In order to avoid putting stress on the drywall, it is important to ensure that the weight is distributed evenly and that there is adequate spacing between anchors when mounting several objects or when utilizing many anchors for a single object.
Use of Safety Equipment:
For the purpose of protecting your eyes from the dust and debris that is produced during drilling, you should wear safety goggles or glasses. Furthermore, the use of gloves can assist in protecting your hands from sharp edges and the possibility of accidents.
Follow the Instructions Provided by the Manufacturer:
In order to ensure that the drywall anchors are installed and used correctly, it is imperative that you always follow the instructions provided by the manufacturer. The mounting process can be made more secure and efficient by adhering to the guidelines provided by the manufacturer.
You will be able to achieve secure and reliable mounting of things using drywall anchors if you incorporate these ideas and best practices into your installation procedure. This will allow you to improve the functionality and aesthetics of your area while also ensuring that the performance will last for a long time.
Summary :
To summarise, for the purpose of securely attaching objects to drywall, it is vital to have a mastery of the installation of drywall anchors. This will ensure that your home improvement projects are stable, durable, and safe. Through an understanding of the various types of drywall anchors that are available, the right preparation of the installation site, and the use of best practices for installation, it is possible to obtain results that appear professional while simultaneously reducing the likelihood of damage or accidents occurring.
Drywall anchors offer supplementary support by dispersing the weight of the mounted object across a broader area of the drywall. This reduces the likelihood of the drywall being damaged or failing to hold the object in place. Whether you are hanging bookcases, artwork, mirrors, or other fixtures, drywall anchors that have been set correctly give a firm foundation for your hung objects, which improves both the functioning and beauty of your area.
You can ensure that the mounting process is successful and secure by selecting the appropriate type of drywall anchors, properly preparing the installation site, using the appropriate tools and equipment, checking for hidden obstructions, testing anchors for stability, properly aligning and leveling the object that is being mounted, taking into consideration weight distribution, using safety equipment, and following the instructions provided by the manufacturer.
Having a firm grasp on the process of installing drywall anchors enables you to confidently take on a variety of home improvement tasks, ranging from straightforward modifications to the interior design to more involved installations, with ease and effectiveness. You will be able to take pleasure in products that are securely placed and that enhance the usefulness and beauty of your space for many years to come if you adhere to best practices and use the appropriate and appropriate installation techniques.
Faqs :
What is the Solution if the drywall anchor hole is too big ?
There are situations when you inadvertently drill the anchor hole in the drywall too deeply. Whenever anything like this occurs, you have a few choices:
Go ahead and grab a larger drywall anchor.
Apply a washer to the toggle bolt if you are using a normal toggle bolt.
In the event that you are utilizing a threaded anchor and the bolt or screw appears to be too small, buy a larger one and check to see whether you can get a secure fit.
You can, of course, steer clear of the majority of these issues by making certain that you adhere to the instructions for the components that are advised. It is also recommended that you drill the hole as straight as possible and avoid “reaming out” the hole for the purpose of drilling. By doing so, everything remains at the size that was intended. In the event that you drill a hole that is too large, you run the risk of enabling the drywall anchor to spin when you insert the screw.
What is the optimal size of the pilot hole for dry wall anchors?
When it comes to drywall anchors, one of the best things about them is that they pretty much tell you exactly what size hole you should drill. A drill bit measuring half an inch is required in order to use the Snaptoggle and FlipToggle anchors that we recommend. There is no need to use a drill bit when using self-tap drywall anchors because you avoid using one.
When you go to the store to get the drywall anchors, make sure to pay attention to the rear of the packaging and purchase the best drill bit among the available options.
What is the depth at which pilot holes should be drilled for dry wall anchors ?
When it comes to dealing with any kind of drywall anchor that involves pre-drilling, there are really just a few things that you need to be concerned about. In the first place, are you drilling into a cavity in the drywall or are you close to a stud? Your second question is if you are drilling into an exterior brick wall or whether there is some other potential barrier.
Under most circumstances, all that is required of you is to pass through the drywall, which is a process that is both straightforward and speedy. On the other hand, if you are going to have to deal with a stud, you might want to consider purchasing an anchor that can also dig into the wood if that becomes necessary. In order to account for any protrusion of the screw out the back, you need to make sure that the depth of the hole is equal to the depth of the drywall anchor, while also adding at least one eighth of an inch.
It is recommended that you make an effort to pick up at least one side of the external block walls with a furring strip when you are working with them.